Tank Coatings: An Often Forgotten Subject
Tank coatings
A gleaming superyacht is an impressive thing, easily admired for its gorgeous exterior lines and sumptuous interior. But behind all the polish and beauty is a whole other, equally extraordinary, world of remarkable technical spaces, ranging from the engine room and generator spaces to storage areas and liquid tanks.
As their name implies, liquid tanks hold various liquids while the vessel is in service. They can broadly be divided into three or four distinct types:
- Fuel/lube tanks are normally unpainted.
- Freshwater tanks are used to store potable water on board. Pool-dump tanks, which hold water from swimming pools while underway, can be considered a subset of this category.
- Greywater tanks hold water coming out of washing machines, dishwashers and showers.
- Blackwater tanks are used for solid and liquid waste from toilets.
Each of these tank types has specific requirements and requires a different coating with distinct specifications regarding application.
Keeping it fresh
Freshwater tanks must obtain certain potable water certificates to confirm that the coating does not pose a health risk to users. These certificates are very specific about the surfaces and specifications that are allowed/certified, and prohibit the use of any uncertified modifications. Moreover, even small failures in freshwater tanks can taint the water. While this may not be a health hazard, it can definitely be upsetting and is not something guests or owners (or crew!) should be exposed to.
Going grey
While greywater tanks may seem straightforward, they are often under the most stress. Greywater can consist of very hot water out of dishwashers and washing machines, and often contains aggressive chemicals such as bleach. Kitchen waste, which can contain relatively large amounts of fats and oils, may also end up here.
We all know the stories of ‘fatbergs’ in city sewers. This is bad enough in concrete or brick sewers, where the fats physically block systems – but in tanks with organic chemical coatings, fats can stick to the sides, damaging the coating. While oils and fats generally float on the surface of water, the constant emptying and filling of the tank contents deposits the fats on the tank surfaces as the water level shifts, eventually coating the whole surface.
Back to black
The blackwater tank for toilet waste is an unpleasant but necessary element. It is also a challenge to any coating. Solid wastes can sink to the bottom of tanks and, depending on a number of factors, start to generate very aggressive microbes. These microorganisms can literally eat their way through a coating or, worse still, steel, if they evolve acidic compounds.
Tackling problems early
These are all considerable challenges. Moreover, the cost of even minor failure in a yacht tank coating can be substantial and should be avoided at all costs. It’s important to remember that tanks don’t generally wear out evenly, and failures
appear at specific weak points. If left unattended, small issues at weak points grow and eventually need repair. But the need for repairs often doesn’t become apparent until the tanks are opened during their survey period, by which point the problem may be too large to remedy in any way other than with a re-blast and re-paint.
Even the best tanks have a limited lifecycle: 10-20 years is a reasonable expectation. In other words, sooner or later, your vessel will need the tanks to be re-painted. This article concerns itself with these refit situations.
New coats and repairs
The cost of coating new tanks is high – possibly the most expensive of any coating per square metre if everything is included – but is simplified by the fact that the tanks are only just being built. In the construction process, the tanks are painted as quickly as possible before all the equipment is built on top and the interior fitted.
Tank repair – whether required during service or decided during a refit – is much more difficult. It always requires the tank to be blasted, locally or overall, and that requires large air extraction hoses, as well as blasting hoses that must be able to reach from the outside of vessel down to deep in the lower tank deck. Painters will also need to walk through the vessel, which is impractical and unhygienic. Even if access is possible from the inside, there is the risk of dust, grit and fumes entering the inner ventilation system.
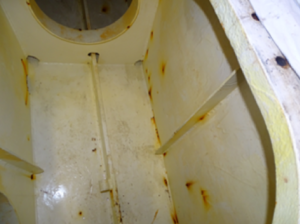
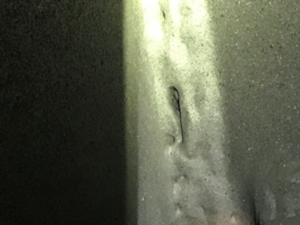
Corrosion along weld seam. From welding problems and lack of control before painting.
Open access
The most practical and easiest solution is to cut a hole in the tank bottom from the outside and gain access this way – in fact, two openings are required to ensure safe operation. Once the tank repair is almost complete, the cut-out is replaced and the opening mended locally from the inside.
As you can imagine, this is not a quick operation. The vessel must stay on the hard for several weeks for the work, resulting in a loss of time and money. Chartering downtime or irritated owners can add to the worries. Mistakes can happen, and costs can quickly run into six figures.
The four Ms
Modern quality production consists of the four Ms: core elements of which you should be aware of and on which you should base your decision-making:
- Man
- Material
- Machine
- Method
All are of critical importance for the high-risk tanks – perhaps even more so than for the exterior, which is predominantly a cosmetic coating operation. If a painter makes a mistake with the exterior, the worst thing that will happen is usually that the finish looks poor; if the same occurs with a tank, you may have a technical failure on your hands.
A fifth M is often quoted, standing for money. However, I would suggest that making money a major part of tank coating decisions is a very short-sighted option. If you disagree, give me a call; I’d love to play a game of poker with you!
Man
Tank blasting and coating are specialist work, all the more so in the case of yacht tanks. Large commercial yards often have in-house teams that can easily coat tanks in bulk carriers – but painting a tank a fraction of the size is a whole other ball game. A two per cent failure in a large commercial tank may not even be noticeable or of any concern between five-year dockings: however, your quality control is probably more stringent.
At the same time, small specialist teams have limited capacity, and quick and effective work progress is often of the essence. For example, as a surface must quickly be coated once blasted, teams must have the capacity to blast, clean and coat within a short window. This often means shift work is a necessity, depending on environmental conditions.
The applicator itself must understand the QA and QC requirements of the coating and the customer. Not every tank coating is the same. Some systems allow thinners in greywater tank applications but absolutely forbid them in freshwater tanks. Similarly, a specification may call for 300 microns for a given brand and 500 for another. Overcoating windows can also vary dramatically depending on tank and specification. This must all be understood before work starts. Make sure you get support from your supplier and/or an independent surveyor to control the applicator.

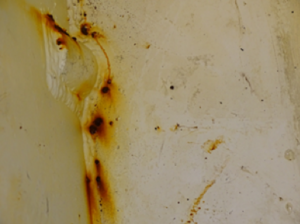
When it goes wrong – it can very wrong. 2 year old tank on >75m yacht.
Material
There are a number of major players in tank coatings, as well as a few smaller suppliers. There is no single perfect coating: every type has its pros and cons. Some coatings contain solvents, others don’t. Local support may be a contributing factor. There’s no need to reinvent the wheel, and if a painter has experience with a given brand, it’s probably best not to demand that they use another.
Likewise, if you require a specific product, ask the local supplier for their recommendations. And while I’m all for creative disruption, there are probably good reasons why the big players in tank coatings are big players. If you think they’re purely exploiting their monopoly situation, just consider that some cruise ships have tank areas bigger than an entire superyacht exterior. The cost of shutting down a cruise ship can bankrupt a supplier (and has in the past). There are some lessons that have been learned the hard way.
Machine
Blasting requires the right grit types, which should be carefully controlled for compliance with specifications. The grits used must be suitable for the substrate (steel and aluminium have differing requirements, for instance) to ensure the right surface profile after blasting. The grits should be of high quality and not contain excessive salts. While the days of using sand from the beach should be over, it might still be best to ensure the applicator knows. Likewise, recycling grit should be avoided.
Tanks must be blasted with clean, dry air as humidity and high temperatures can cause condensation in the air pressure lines. You do not want moisture added to the grit or the surface. Driers and filters should be available at all times and used as necessary.
It’s important to carefully select the equipment used for applying coating materials. Solvent-free products are invariably thick and difficult to atomise, requiring high-volume pumps (>50:1 pump ratios). Hot twin-feed is often recommended by suppliers to ensure a good performance: heated pumps lower the viscosity of the materials and ensure good atomisation and flow. The use of lower-quality machines can cause complications with the flow and the thickness of the wet film – in other words, if the flow is weak, the applicator may attempt to compensate by applying the material more thickly, which can cause the allowed film thickness to be exceeded and cause runs and sags in the film.
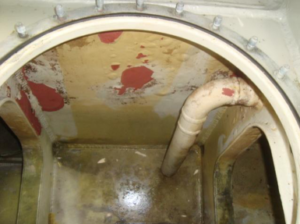
Manhole grey/black water tank no. 5 – flaking due to delamination.
Ambient conditions during both the application and curing of the products are critical. It is a major misconception that solvent-free means that only minimal air extraction is required. Solvent-free epoxy paints, the most common of all tank coatings, contain high levels of amine-type products with low molecular weight, which must be removed from the tank to ensure full cure. Tanks have many frame plates fixed onto the surface and walls, which can cause fumes to ‘pool’. Proper ventilation must consist of sufficient feed-air and extraction capacity to ensure sufficient air movement from all tank spaces, which requires multiple hoses/blowers to be used. Of course, using solvent-containing coatings also requires sufficient ventilation. Solvent vapours sink and affect the curing of the film, increasing risk of failure.
Temperature and humidity control are critical from blasting until full cure. High humidity can lead to corrosion on the surface before application. In addition, high humidity can interfere with the curing of the products. This is made worse by application and curing at low temperatures. Solvent-free products are especially sensitive to this problem. That means that the ambient conditions must be controlled not only during the application process but also throughout the curing process. This should be considered to be 7-14 days depending on product used and conditions.
Painting tanks while a boat is in the water is fraught with challenges. The outside water temperature is often cooler than the air temperature in many yards, leading to serious risk of dew-point condensation. Any in-water tank coating must therefore very carefully consider the proposed product and its climatic control limitations in the given environment.
Amine sweat caused by low temperatures and/or humidity on the surface can be assessed by special test kits. Any amine sweat requires removal by cleaning with warm water and Scotch-Brite™-type sanding pads. Left on the surface, it practically guarantees failure. Checks should be made between coats to ensure that there is no risk. Amine sweat often occurs in local patches rather than everywhere at once, so all tank surfaces should be checked. The overcoat should also be inspected and approved.
Method
Very small tanks are incredibly complex to blast and spray. Some tank designs allow the use of large-volume blasting hoses and nozzles for the easily-accessed areas but need smaller, more malleable equipment to get into difficult-to-reach corners and the reverse sides of stringers, frames, etc. The same goes for spraying: some areas in tanks may not be possible to spray and can only be painted with a brush.
Rollers should be avoided in tanks. The rough metal surfaces can pull fibres off the roller, encasing them in the coating and later leading to wicking and breakdown of the coating. Brushes are much more suitable as they have larger and easily detected bristles that can be picked out whilst wet or cured.
There are often pipes running through tanks. These should ideally be removed before any rework, as should any brackets used to support them. Anti-vibration rubbers holding the pipes must be removed and the inner surface of the pipes must also be coated.
Any stainless steel items in the tanks should be prepared and coated. Stainless steel is inert unless it forms an electrolytic cell with another material (normal steel or aluminium) through a pinhole or area of low dry-film thickness, in which case it will act as a cathode and corrode the normal steel.
Most important to any refit of tanks is that quality control measures be carefully written down and confirmed by all parties before beginning. Supplier recommendations must be followed as a minimum. A list of critical test points follows below.
Metal dressing
ISO8501-3 concerns itself with the preparation of the metal before blasting. This is a critical and often overlooked process. Most of the defects we see begin at the steel dressing stage, with incorrect welding seams, pinholes and undercutting as the largest issues.
On “average”, tank is good. However most of failures begin at weld seams and edges proving importance of close and thorough metal dressing BEFORE coating.
To ensure proper preparation, all edges must be rounded: it’s better that they be too round than too sharp. Most specifications require a radius of less than two millimetres. Note that, in case of a tank refit, blasting may open pinholes that had been hidden just under the surface of the original weld. These often have to be repaired before continuing work. Ideally, they should be mended through welding, but it may suffice to open them with a small drill and then fill them with a metal-repair putty. The decision should depend on the supplier’s technical support recommendations.
Blasting to remove old coatings on edges often sharpens the edge. To remedy this, you may need to regrind the edges after blasting. Special attention should be taken at drain holes (so-called mouse holes).
One of the most critical areas to check is soluble salt content on the surface before application. Any soluble salts remaining on the surface before coating will attract moisture through the coating through osmotic pressure over time. While no tank coating is 100% impervious to moisture, minimising salt content on the surface can make this osmotic driving force negligible. This is why the allowable salt content is thoroughly specified by suppliers for each tank coating type.
In a refit situation, existing tank coating should be washed multiple times with freshwater until the surface is within or very close to specification. If clean grit is used, the tank should in normal circumstances come within the specification. If this is not done, the blasting action will just spread any contamination over the surface and, worse still, spread it into the surface profile. In this case, you will be required to wash the blasted surface, which will cause rusting, which in turn will require re-blasting. Always ensure that the washing is in your contract offer. We have seen contracts that did not specifically state this and specified that any extra cleaning and blasting would be billed separately.
Any areas of corrosion breakdown, i.e. rust or pitting, should be power tooled first and the debris removed before blasting. Again, trying to blast larges of rust out of a tank runs the risk that the corrosion products (metal oxides mixed with moisture and whatever else was in the tank) will be blasted into the surface profile.
Poor weld. This WILL cause failure. Must be repaired.
Surface profile/blast cleanliness
The surface profile of the metal is critical. Too prominent a profile may require excessive film thickness, which runs the risk of cracking. Too low a profile leads to insufficient key and may cause loss of adhesion (adhesive strength being one of the major factors in corrosion prevention), Acceptance criteria and test procedures should be specified and agreed before a contract is signed to avoid any delays and issues.
The profile can be assessed by a range of methods, some simple, some more complex. Generally speaking, if the grit type is of the correct hardness and size, the blaster will achieve the correct profile. Inspection is more about ensuring that the desired profile is achieved on 100% of the tank surface. The problem with this is limited access and visibility until a tank is cleaned out, which may mean some areas may have to be re-blasted later on.
Dry-film thickness (DFT)
Stripe coating must be used as recommended by all suppliers. This ensures that the high-risk areas receive sufficient coating and is required on all edges and seams, as well as any areas that can’t be reached by the spray fan. Every tank coating has a
specified thickness, as well as a maximum and minimum. This data must be received from the supplier in an official document. Some products can be used at certain DFTs but not in a specific tank. Do not make your own specification.
One common point of contention is the use of DFT as a QC instrument. Imagine you have a small tank in the dimensions 2x2x4 metres: How many measuring points should you make? SSPC-PA2 and IMO ballast tank regulations specify a frequency for measurements, but I would argue that these methods are unsuitable for small tanks. The very nature of small tanks makes an even spray film almost impossible, leading to large variation in DFT. If you only measure every few metres, which these standards allow, you can miss large areas. And, as I stated above, big problems can start in small places. I would argue that the DFT measurement should be used to find any low/high spots specifically; but this should be agreed at the contract stage, as you may otherwise find one side saying the tank is within specifications (100 readings) whilst 600 readings say something different.
A shadow issue with any tank coating specification is the variation resulting from the distribution of DFT per coat. An applicator will try to apply the nominal DFT. This results in a bell curve distribution of DFT, with high and low values clustering around a mean. A normal coat is applied two to three times, which can compound any errors.
In conclusion
The take-home message is never underestimate the complexity and risks involved in tank refits. Talk carefully and thoroughly with all parties. Before beginning, get sound advice from suppliers and consultants to ensure a thorough and complete paint inspection plan agreed in writing in your refit contract. Only then can you truly enjoy your yacht and all its facilities without stress or trouble.
Written by Colin Mason, Technical Manager CCS
Colin has a university degree in Applied Chemistry. He has 30 years of expertise in yacht coatings project management, quality control of paint teams and training of inexperienced/learner painters. He is experienced in all aspects of superyacht coating i.e. topcoat spraying, filler application, tank coating, interior coating etc. and specialised in polymers. Furthermore, Colin has worked for mayor superyacht builders around the world.
Would you like to learn more? Go to www.ccsyacht.com or call the CCS office on +31 7512150.
Stay up-to-date with our articles and like our LinkedIn Page https://www.linkedin.com/in/ccsyacht/